Key takeaways
- Ordering by appearance alone instead of matching the exact valve model and cartridge dimensions.
- Failing to shut off both hot and cold water before removing the retaining hardware.
- Using a screwdriver or pliers to pry against the valve body.
- Installing the cartridge backward, which can reverse hot and cold operation or prevent temperature regulation.
- Using petroleum-based lubricant or too much grease on the seals.
- Overtightening a retaining nut and damaging threads or the cartridge shell.
- Skipping the anti-scald adjustment after replacing the cartridge.
- Closing the wall before checking for leaks and stable temperature.
A thermostatic shower mixing valve automatically blends hot and cold water to hold a steady temperature. When its cartridge becomes clogged, worn, or seized, the shower may run cold, turn unexpectedly hot, drip after shutoff, or provide only a weak flow. Replacing the cartridge can restore proper temperature control, but a rushed job can damage the valve body, strip retaining threads, loosen pipe connections inside the wall, or leave the anti-scald limit incorrectly set. In the worst case, the shower can deliver dangerously hot water.
This guide explains how to replace a thermostatic cartridge in a typical concealed shower valve. The trim design, retaining method, cartridge dimensions, and shutoff arrangement vary by manufacturer, so identify the valve before ordering parts. Set the water heater or shower limit to no more than 120°F, and test the finished shower carefully.
As an Amazon Associate we earn from qualifying purchases at no extra cost to you. Product prices and availability are accurate as of the date shown and are subject to change.

What You Need
| Item | Why | Optional? |
|---|---|---|
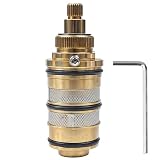
| Correct replacement thermostatic cartridge | The cartridge must match the valve body, brand, model, orientation, and seal arrangement. Common replacement prices range from about $18 for a generic brass cartridge to $163 for a branded cartridge such as a C7912-compatible replacement. | No |
| Phillips and flat-head screwdrivers | Removes handles, escutcheon plates, cover caps, and retaining screws. | No |
| Hex-key set | Many shower handles use a small grub screw, often 2.5 to 4 mm. | Often |
| Adjustable wrench or appropriately sized open-end wrench | Loosens the cartridge retaining nut or sleeve without crushing it. | No |
| Cartridge-puller tool | Provides straight, controlled pulling force when mineral buildup has seized the cartridge. | Recommended for stuck cartridges |
| Silicone plumber’s grease | Lubricates O-rings and helps the new cartridge slide into place. Use only grease approved for potable-water plumbing. | Recommended |
| Old towel, container, and masking tape | Protects the finish, catches drips, and labels parts or handle positions. | Helpful |
| Replacement O-rings and a soft nylon brush | Useful if the kit does not include seals or if the valve body has light scale. | Helpful |
Step-by-Step
-
Identify the valve and buy the correct cartridge — 15 to 30 minutes
Look for a brand name or model number on the escutcheon, handle, valve cover, installation paperwork, or the cartridge itself. Photograph the trim before disassembly. If possible, remove the handle and measure the old cartridge after the water is isolated. Note its overall length, outside diameter, number and position of locating tabs, spline pattern, O-ring locations, and the hot-side orientation.
Do not assume that two cartridges with the same apparent length are interchangeable. A generic thermostatic replacement may cost roughly $18, while a manufacturer-specific brass cartridge can cost $100 to $163. The cheaper part is not a bargain if its ports or temperature-control mechanism do not match the valve.
-
Shut off the water and relieve pressure — 10 to 20 minutes
Close the integral service stops behind the trim if the valve has them. Usually, a flat-head screwdriver turns each stop clockwise, but do not force a seized screw. If there are no service stops, close the home’s main water supply. Open the shower and another nearby faucet until flow stops.
Cover the drain and place a towel over the tub or shower floor. This prevents small screws from disappearing and protects the finish. If the shower has separate hot and cold supplies that can be isolated independently, close both.
-
Remove the handle and decorative trim — 10 to 20 minutes
Find the handle’s hidden set screw, which may sit beneath a cap or on the underside. Loosen it with the correct hex key, then pull the handle straight off. Avoid prying against finished tile or forcing the handle sideways.
Remove the temperature stop, retaining ring, faceplate, and any sleeve in the order they come off. Keep screws in a container and photograph each layer. If caulk holds the escutcheon to the wall, cut only the perimeter bead with a sharp utility knife. Do not cut deeply into the wall or valve seals.
-
Expose and remove the retaining hardware — 10 to 25 minutes
Most thermostatic cartridges are held by a threaded retaining nut, retaining sleeve, horseshoe clip, or end cap. Clean visible scale first so debris does not fall into the valve. Mark the cartridge’s original position with masking tape, especially the top, bottom, and hot-side indicator.
Use a correctly fitting wrench and turn counterclockwise. Support the valve body with your other hand, but do not twist the pipes behind the wall. If the retaining nut will not move, apply penetrating lubricant only to the exposed metal threads and wait several minutes; keep it away from rubber seals and finished surfaces.
-
Extract the old cartridge — 5 to 30 minutes
Pull the cartridge straight out while gently rocking it a few degrees. Do not lever against the valve body with a screwdriver. If it is stuck by mineral deposits, use a cartridge-puller made for that valve. Excessive force can crack a brass valve body or pull a concealed fitting loose.
Compare the old and new parts before cleaning anything. Confirm that the port openings, guide tabs, stem length, O-rings, and temperature stop match. If the old cartridge comes out in pieces, retrieve every fragment before installing the replacement.
-
Clean the valve body and lubricate the seals — 10 to 15 minutes
Wipe the inside of the valve with a clean cloth. Use a soft nylon brush to remove loose scale, but do not scratch the sealing surfaces. Never use sandpaper, a metal pick, or a drill inside the valve. Flush briefly only if you can control the water safely and keep the wall cavity dry.
Apply a thin film of silicone plumber’s grease to the new cartridge’s O-rings. Do not use petroleum jelly, automotive grease, or an excessive amount of lubricant, which can damage rubber or restrict the ports.
-
Install the new cartridge in the correct orientation — 10 to 20 minutes
Align the cartridge’s locating tabs and hot/cold markings with the matching grooves in the valve body. Slide it in straight, using steady hand pressure. It should seat fully without hammering or forcing. Reinstall the retaining clip, sleeve, or nut and tighten it securely, following the manufacturer’s torque specification if one is provided. Do not overtighten.
Before replacing the trim, slowly open the service stops or main supply. Watch the exposed valve for at least two minutes. If water leaks around the cartridge, shut off the supply and check that the seal is seated, the retaining hardware is installed, and the cartridge is fully home.
-
Reassemble, set the temperature, and test — 15 to 30 minutes
Replace the sleeve, faceplate, temperature stop, handle, and caps in their original order. Turn the shower on and let it run for two to three minutes. Test the temperature with a reliable thermometer at the shower outlet. A comfortable shower setting is commonly around 100°F to 110°F; the outlet should not exceed 120°F.
Adjust the anti-scald stop according to the valve instructions. Turn the handle from cold to hot several times, checking for smooth movement, stable temperature, drips, and normal flow. Recheck all visible joints after the shower has been off for 10 minutes.
Mistakes to Avoid
- Ordering by appearance alone instead of matching the exact valve model and cartridge dimensions.
- Failing to shut off both hot and cold water before removing the retaining hardware.
- Using a screwdriver or pliers to pry against the valve body.
- Installing the cartridge backward, which can reverse hot and cold operation or prevent temperature regulation.
- Using petroleum-based lubricant or too much grease on the seals.
- Overtightening a retaining nut and damaging threads or the cartridge shell.
- Skipping the anti-scald adjustment after replacing the cartridge.
- Closing the wall before checking for leaks and stable temperature.
How Often
There is no universal replacement interval. A thermostatic cartridge may last 5 to 15 years, depending on water hardness, filtration, usage, and cartridge quality. Inspect or service it when the temperature fluctuates, the handle becomes stiff, the shower drips after shutoff, or flow decreases. In areas with hard water, cleaning the showerhead and servicing the cartridge every few years can reduce buildup. A whole-home sediment or scale filter may also help, but it does not eliminate normal seal wear.
When to Call a Pro or Replace
Call a licensed plumber if the home’s shutoff will not close, the cartridge will not release with moderate pulling force, the valve body moves inside the wall, or water leaks behind the escutcheon. Professional help is also sensible when the valve is soldered into a confined wall cavity, the model cannot be identified, or the shower still runs dangerously hot after correct installation.
Replace the complete mixing valve rather than only the cartridge if the body is cracked, badly corroded, cross-threaded, or no longer holds the cartridge securely. Consider replacement when a discontinued cartridge is unavailable or costs nearly as much as updating the valve. A new valve may also be worthwhile during a bathroom renovation when access to the plumbing is already open.
FAQ
Can I replace a thermostatic cartridge without removing the tile?
Usually, yes. Most cartridges are designed to come out through the trim opening. If the valve has no accessible retaining hardware or the cartridge is severely seized, limited wall access may be necessary.
How do I know whether the cartridge is bad?
Common signs include temperature swings, a shower that stays cold or hot, a stiff control, dripping after shutoff, or reduced flow on one side. First confirm that the supply stops are fully open and the showerhead is not clogged.
Why is the new cartridge hard to insert?
It may be misaligned, the valve may contain scale, or the replacement may be incorrect. Remove it, compare every tab and port with the old part, clean the bore gently, lubricate the O-rings, and try again without forcing it.
What temperature should I set after replacement?
Set a comfortable operating temperature around 100°F to 110°F and verify that the maximum outlet temperature does not exceed 120°F. Follow the valve manufacturer’s instructions if they specify a lower limit for children, older adults, or other users who are more vulnerable to burns.