Key takeaways
- Wall width at floor, counter, and mirror heights
- Stud or masonry locations and verified backing zone
- Floor level variation and finished-floor continuity
- Supply, drain, shutoff, outlet, and switch coordinates
- Door, drawer, toilet, shower-door, and entry clearances
- Counter height, sink rim, faucet reach, and mirror elevation
- Top thickness, backsplash, side splash, and trim projections
- Delivery route, cabinet weight, and safe lifting requirements
A floating vanity hangs above the floor; a freestanding vanity carries most of its weight through legs or a cabinet base. That visible difference changes where loads go, how pipes enter, what an uneven floor does, and how much wall repair a remodel may require. Neither type is automatically modern, durable, accessible, or easy to install.
The useful comparison begins with a field survey and the installation manual for the exact model. Product families vary in weight, back-rail position, fasteners, drawer clearances, plumbing zones, and top construction.
Our top picks


As an Amazon Associate we earn from qualifying purchases at no extra cost to you.
Affiliate disclosure: Eligible purchases made through site links may produce revenue without changing the buyer’s price.
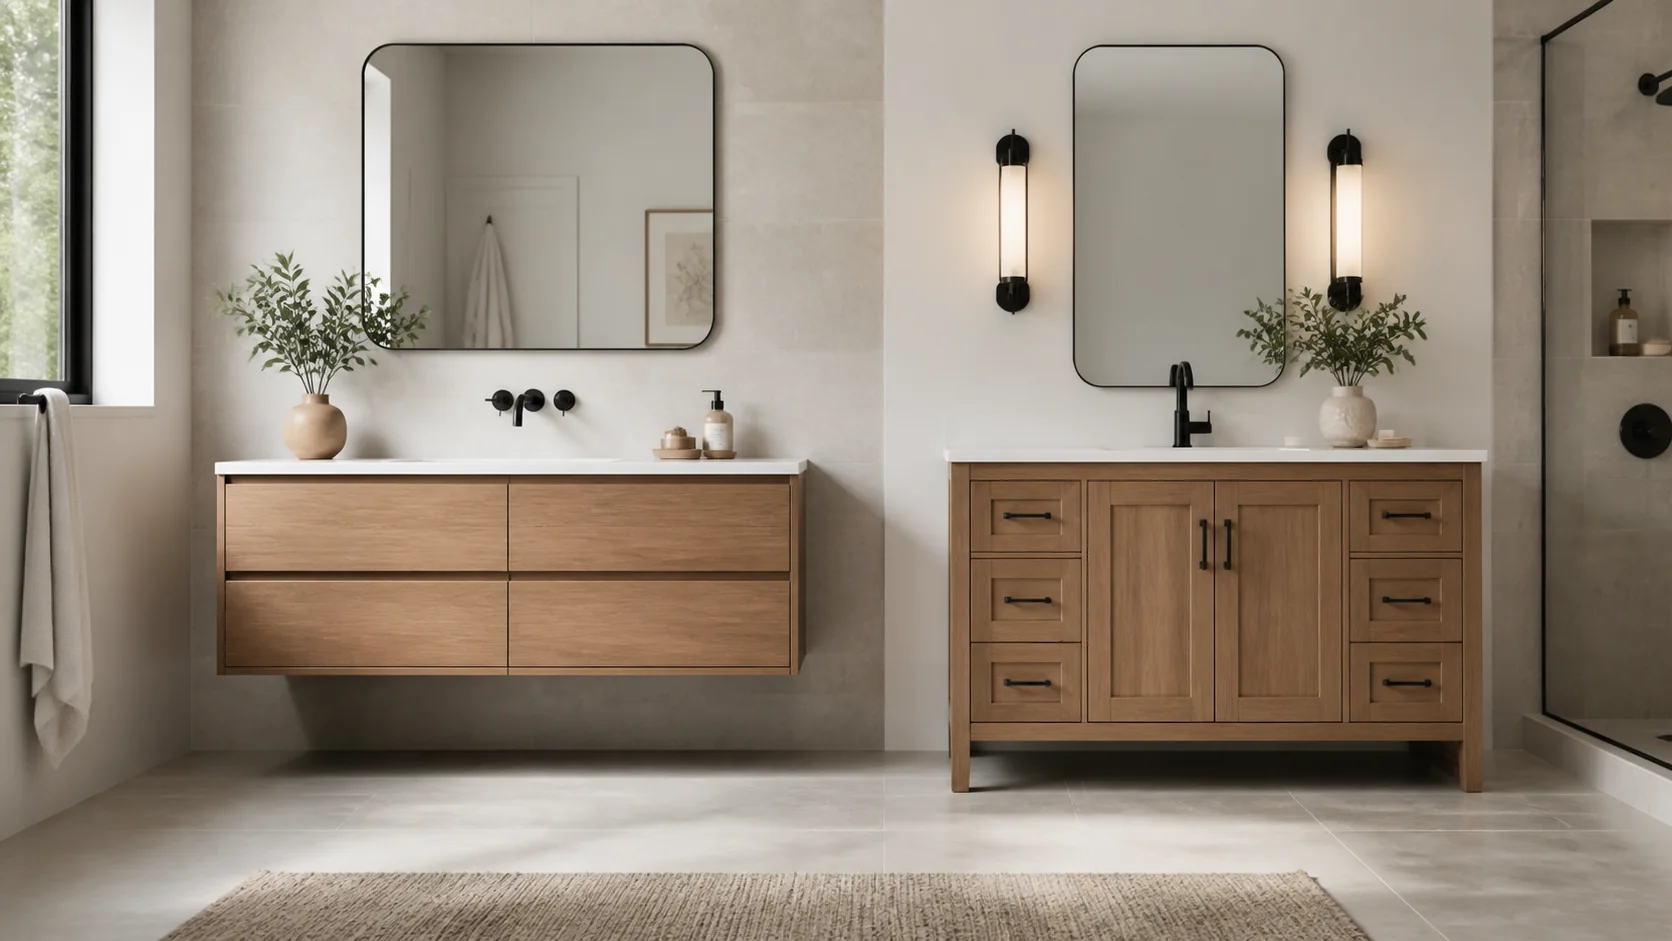
Scenario Comparison
| Existing condition or goal | Floating vanity | Freestanding vanity |
|---|---|---|
| Wall open during full remodel | Blocking and rough-ins can be placed deliberately | Anchoring is straightforward; floor carries vertical load |
| Finished tiled wall with unknown framing | Risky until studs/backing are verified; opening may be needed | Often less wall intervention, but still requires safe anchoring |
| Uneven or sloped floor | Can establish a level cabinet independent of floor contact | Needs levelers, shims, trim decisions, and stable bearing |
| Frequent floor cleaning | Open area improves mop and visual access | Toe-kick contains the footprint but creates perimeter joints |
| Maximum enclosed storage | Suspension height may reduce cabinet volume | Commonly uses more of the floor-to-counter height |
| Future furniture-style replacement | Mounting and wall repairs may limit simple swaps | More forgiving when new footprint and rough-in remain compatible |
| Wheelchair approach or customized height | May offer knee/toe options when designed as an accessible assembly | Standard base can obstruct approach; specialized models exist |
The table identifies questions, not universal winners. A specific freestanding cabinet can require substantial wall fastening, and a purpose-designed floating assembly can carry large loads safely when installed into the required structure.
Wall Structure and Load Path
A floating vanity sends cabinet, countertop, basin, stored-item, and incidental user loads into its rail, fasteners, backing, studs, and wall assembly. Tile or drywall is a finish, not structural proof. Locate studs and investigate blocking before selecting a unit whose mounting points cannot reach suitable support.
Kohler’s current installation guide for one wall-hung/legged family specifies 2×6 bracing, pilot holes, rated 5/16-inch lag bolts, temporary support for the wall-hung version, and verification that the cabinet is level and plumb. Those requirements are model-specific, but they illustrate the load path that must be documented. See the Kohler installation and care guide.
A freestanding label does not eliminate anchoring. Robern’s Craft Series instructions require securing its vanity through the back rail into studs to prevent movement; larger sizes can require more attachment points. See the Robern vanity installation instructions. Use the purchased model’s specified screws, washers, anchors, and engagement—not a generic hardware pack.
When walls are open, photograph blocking and rough-ins with measurements before closure. On masonry, metal studs, or unusual partitions, obtain an attachment design suitable for that assembly. Do not infer capacity from a successful light-duty anchor test.
Plumbing Position and Drawer Geometry
Plot hot supply, cold supply, drain centerline, shutoffs, trap, sink outlet, and faucet connections against the cabinet’s interior drawing. Floating designs often emphasize visible space below, so a low wall drain or floor-entering supplies can defeat the intended appearance. Moving them means opening finishes and potentially obtaining permits.
Drawers are a frequent conflict. Full-depth drawers may use a U-shaped plumbing cutout or a narrow service chase; shelf-based cabinets are often more forgiving. Measure the trap in three dimensions and include room to remove it later. Decorative exposed traps still need approved connections and service access.
For a vessel sink, total counter height includes the bowl and influences faucet height and reach. An undermount sink occupies cabinet volume. Double sinks multiply drain and faucet connections and can constrain central drawers. Select sink, top, faucet, and vanity as one coordinated assembly.
Floor Level, Moisture, and Cleaning
A floating vanity reveals the flooring beneath it. That can make a small room feel visually open and allows cleaning tools to pass under the cabinet, but dust, plumbing drips, and unfinished patches are also more visible. Confirm that finished flooring extends continuously under the intended footprint.
A freestanding unit rests on legs, levelers, or a base. Check floor flatness and slope in both directions. Levelers can correct limited variation, while large gaps may remain visible at walls or bases. Scribing and trim can conceal irregularity but should not trap water against vulnerable materials.
Neither configuration is waterproof. Protect cutouts and exposed edges according to product instructions, provide ventilation, repair leaks promptly, and use cleaners approved for the cabinet, top, sink, and finish. A raised cabinet may make leak evidence easier to see; a toe-kick may keep routine splash away from stored items but can hide moisture at the perimeter.
Storage, Daily Use, and Accessibility
Compare usable storage, not outside dimensions. Inventory tall bottles, towels, cleaning supplies, grooming tools, and electrical devices. Record drawer height, shelf adjustment, plumbing intrusion, handle projection, and whether a door blocks the toilet or entry.
Floating height can be customized within structural and product limits, but “higher” is not automatically accessible. User reach, mirror, faucet, sink depth, knee clearance, toe clearance, pipe protection, and maneuvering space work together. Accessibility rules and individual needs require a complete design, not a cabinet suspended at an arbitrary height.
Freestanding products are widely available in standard heights and furniture styles. Their legs or toe-kicks may limit forward approach, though purpose-designed accessible models can solve that differently. Test the tallest, shortest, and least-mobile user’s posture before finalizing counter and mirror positions.
Installation Complexity and Remodel Constraints
In new construction or a gut remodel, a floating vanity can be efficient because blocking, plumbing, outlets, backsplash, and mirror mounting are coordinated before finishes. In a surface-only refresh, unknown wall structure and low rough-ins can make it the more invasive option.
A freestanding replacement is often simpler when its footprint covers old flooring and paint, the rough-in enters a generous cabinet cavity, and the top aligns with existing backsplash. It becomes complex when baseboards prevent wall contact, floor slope exceeds leveler adjustment, drawers conflict with pipes, or a wider unit exposes unfinished surfaces.
Sequence the work: verify field conditions; select cabinet, top, sink, and faucet; resolve support and rough-ins; complete permitted concealed work; finish wall and floor; set and secure the cabinet; install top and fixtures; connect plumbing; then test. Do not close a wall until backing and utility locations have been photographed and checked against the current drawing.
Field Measurement Sheet
- Wall width at floor, counter, and mirror heights
- Stud or masonry locations and verified backing zone
- Floor level variation and finished-floor continuity
- Supply, drain, shutoff, outlet, and switch coordinates
- Door, drawer, toilet, shower-door, and entry clearances
- Counter height, sink rim, faucet reach, and mirror elevation
- Top thickness, backsplash, side splash, and trim projections
- Delivery route, cabinet weight, and safe lifting requirements
Record dimensions from one fixed origin rather than several nearby edges. Photograph the tape in place. Compare every value with the manufacturer’s rough-in and installation drawings, noting tolerances rather than rounding a tight fit upward.
Safety and limitations
Heavy cabinets and tops can cause injury, and incorrect attachment can produce sudden failure or water damage. Verify hidden utilities before drilling, use required support and fasteners, and use qualified plumbing or structural help where appropriate. This guide cannot assess a wall, accessibility compliance, local code, or a specific product.
Coordinate the next decision with the bathroom vanity size guide.
Floating vs Freestanding Vanity FAQs
Can a floating vanity attach only to drywall anchors?
Do not assume so. Follow the exact manual. Many models require studs or installed backing and rated structural fasteners.
Must a freestanding vanity be fastened to the wall?
Many manufacturers require wall attachment to prevent shifting or tipping. Floor contact does not replace the model’s anchoring instructions.
Which design is easier to clean?
Open floor below a floating unit improves mop access. A freestanding toe-kick prevents debris from traveling underneath but adds joints and corners. Choose based on actual clearance and cleaning tools.
Which option hides plumbing better?
Either can hide plumbing when rough-ins align with the cabinet cavity. Floating designs can expose low drains or floor supplies more readily.
Can I switch styles without moving plumbing?
Sometimes. Overlay the new cabinet’s drawer and service zones on the existing rough-in. A mismatch may require another model, cabinet modification approved by the manufacturer, or plumbing relocation.
Decision Rule
Choose a floating vanity when verified wall support, compatible rough-ins, continuous finished flooring, and the desired cleaning or access benefits align. Choose freestanding when floor bearing, greater storage, easier coverage of existing finishes, and a more forgiving replacement path matter more. Style should settle a tie only after structure, plumbing, floor condition, use, and future service have been resolved.