Key takeaways
- Buying by the cabinet’s advertised width instead of its interior width and door opening.
- Filling the cabinet so completely that a plumber cannot reach the trap or shutoff valves.
- Placing heavy bottles on a high, unstable shelf where they can fall when the door opens.
- Using a fabric organizer directly under a potentially leaking valve.
- Mounting a tension rod against supply lines or relying on friction when it visibly bows.
- Storing medicines, cosmetics, or towels beside harsh cleaning chemicals.
To organize a bathroom cabinet under the sink, measure around the P-trap first, then choose a U-shaped pull-out drawer, stackable bins, or a tension-rod system that leaves the drain, shutoff valves, and supply lines accessible.
Our top picks


As an Amazon Associate we earn from qualifying purchases at no extra cost to you.
Start with the plumbing, not the organizer
The P-trap is the curved section of drainpipe beneath the sink. It occupies the center or rear of the cabinet and makes a normal rectangular drawer or storage box impossible to use efficiently. Before buying anything, empty the cabinet and record the usable space around the plumbing.
| Measurement | How to measure it | Why it matters | Useful target |
|---|---|---|---|
| Cabinet width | Measure the inside wall to inside wall, not the outside doors | Determines the maximum organizer width | Leave 1–2 inches total side clearance |
| Cabinet depth | Measure from the inside front edge to the back wall | Prevents doors or hinges from hitting the organizer | Choose an organizer 2–3 inches shorter |
| Clearance under the sink bowl | Measure from the cabinet floor to the lowest point of the basin | Sets the maximum organizer height | Keep at least 1 inch below the bowl |
| P-trap width and depth | Measure the widest pipe section and its projection from the back wall | Shows how much space a center cutout must avoid | Allow 1–2 inches around the pipe |
| Door opening | Measure the clear opening between hinges and the opposite frame | A cabinet may be wider inside than the opening | Organizer width should be at least 1/2 inch narrower |
| Shutoff-valve clearance | Measure from the cabinet floor to the lowest valve and supply line | Prevents blocked water controls | Keep 2 inches of reachable space in front |
Use cardboard to make a full-size outline of the organizer before ordering. Slide it into the cabinet with the doors closed. This simple test reveals problems caused by hinges, face frames, uneven floors, and plumbing that is not centered.
Choose the best layout for your situation
| Your situation | Best choice | Why | Trade-off |
|---|---|---|---|
| Small apartment bathroom | Two narrow stackable bins or a compact two-tier shelf | Uses vertical space without requiring installation | Bins must be removed to reach items behind them |
| Large vanity with a centered P-trap | U-shaped pull-out drawers | Creates storage on both sides of the drain while keeping contents accessible | Usually costs more and needs accurate width measurements |
| Children or pets | Latching bins on an upper tier or a secured pull-out organizer | Keeps cleaners, medicines, and sharp tools contained | Child-resistant storage still requires proper supervision |
| Renters | Freestanding bins, removable shelf risers, or a tension rod | No drilling or permanent cabinet modifications | Freestanding systems may shift unless fitted tightly |
| Back or knee pain | Full-extension pull-out drawers with low-friction runners | Brings supplies forward instead of requiring deep bending | Installation must avoid pipes and allow the drawer to extend fully |
Three effective ways to organize around a P-trap
1. U-shaped pull-out drawers
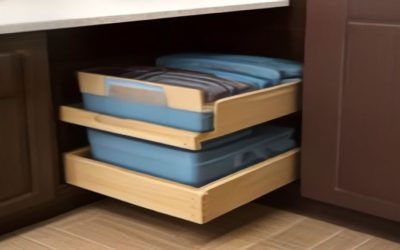
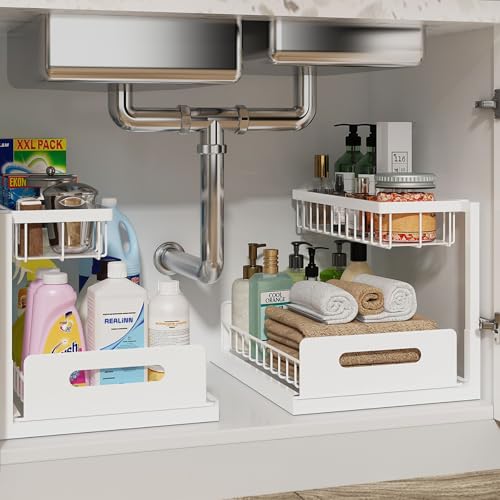
A U-shaped, or under-sink, pull-out drawer has a cutout at the rear or center for the drainpipe. It uses the otherwise wasted floor area on both sides of the P-trap and is the best option when you want daily access to several products.
Look for a drawer with adjustable dividers, a raised edge, and runners rated for at least 20–30 pounds. A 12–18 inch-wide unit often fits one side of a standard vanity, while wider models may require a double-door cabinet with a generous opening. Check whether the pipe cutout is centered, offset, or adjustable; a fixed center notch will not work well with an off-center drain.
Leave enough room for the drawer to pass the shutoff valves. A drawer that clears the P-trap but strikes a valve when pulled out is not a usable solution. Metal frames resist swelling from occasional leaks, while sealed engineered wood can look more integrated with a vanity. Avoid unfinished particleboard because a small plumbing leak can cause edge swelling and delamination.
2. Stackable bins and shelf risers
Stackable bins are the simplest way to divide tall, awkward cabinet space. Use a lower bin for spare toilet paper, towels, or refill bottles and an upper bin for lighter items such as cosmetics, hair accessories, or first-aid supplies. Choose open-front or pull-out bins if you need access without unloading the top layer.
Measure each side of the P-trap separately. The left and right spaces may not be equal, especially when the drain is offset. Narrow bins around 6–9 inches wide are often easier to fit than one large container. Keep at least 2 inches of open space around pipe joints so you can see drips and place a small leak detector on the cabinet floor.
Clear polypropylene is practical for identifying contents and tolerating moisture. Wire baskets provide ventilation but allow small bottles to tip through the gaps. Fabric cubes hold soft goods but can absorb water and develop odors if a valve leaks. Whatever the material, use bins with flat bottoms and handles that do not catch on the cabinet frame.
3. A tension rod for bottles and spray cleaners
A tension rod installed across the cabinet can hold spray bottles by their trigger handles, freeing floor space for bins. Use a corrosion-resistant metal rod with rubber or silicone end pads. It should be installed below the sink bowl and above the P-trap, not pressed against flexible supply lines.
Check the rod’s rated load and keep the total hanging weight modest—about 8–12 pounds is a sensible working limit for a small cabinet unless the manufacturer specifies more. Test it by pulling a full bottle forward several times. If the rod rotates, slides, or presses into plumbing, use a freestanding rack instead.
How to organize the cabinet step by step
- Inspect for leaks. Run the faucet, drain the basin, and check the trap, compression nuts, and supply valves with a dry paper towel. Repair leaks before adding storage.
- Group items by use. Create separate groups for daily toiletries, cleaning products, backup supplies, hair tools, and first-aid items. Discard expired products and dried-out sponges.
- Mark the plumbing footprint. Use painter’s tape on the cabinet floor to outline the P-trap, valves, and supply lines. The tape should remain visible after organizers are installed.
- Put frequent-use items in front. Place hand soap refills, toilet-cleaning supplies, and daily grooming products in a pull-out drawer or front bin. Store backups farther back or higher up.
- Separate chemicals. Keep bleach, disinfectants, drain cleaners, and other chemicals in a dedicated, labeled bin. Never store them with cosmetics, toiletries, towels, or medicines.
- Protect the cabinet floor. Use a removable waterproof tray that does not cover the entire plumbing footprint. It should have a low lip and enough clearance to expose leaks.
- Test access. Open both doors, pull every drawer fully forward, turn each shutoff valve, and remove the trap area from view. If any basic maintenance task requires dismantling the system, rearrange it.
Materials, construction, and durability
| Organizer construction | Strengths | Weaknesses | Best use |
|---|---|---|---|
| Powder-coated steel | Strong, slim, and resistant to bending | Can rust where the coating is scratched; may rattle | Pull-outs and heavy cleaning supplies |
| Solid wood or bamboo | Attractive and rigid | Can warp or stain if not sealed; takes more space | Visible open shelving in a dry, well-maintained vanity |
| Sealed engineered wood | Uniform panels and furniture-like appearance | Edges can swell after repeated water exposure | Dry storage where plumbing is reliable |
| Polypropylene plastic | Lightweight, washable, and moisture tolerant | May flex under heavy loads or slide on smooth floors | Bins, trays, and renters’ removable storage |
The parts most likely to wear first are drawer runners, rubber feet, tension-rod end pads, and laminate edges. For a pull-out used several times a day, choose metal runners with a soft-close or ball-bearing mechanism rather than thin plastic rails. For occasional-access backup storage, simple bins are usually better value and easier to replace.
Common mistakes to avoid
- Buying by the cabinet’s advertised width instead of its interior width and door opening.
- Filling the cabinet so completely that a plumber cannot reach the trap or shutoff valves.
- Placing heavy bottles on a high, unstable shelf where they can fall when the door opens.
- Using a fabric organizer directly under a potentially leaking valve.
- Mounting a tension rod against supply lines or relying on friction when it visibly bows.
- Storing medicines, cosmetics, or towels beside harsh cleaning chemicals.
When a custom solution makes sense
Consider a custom drawer or cabinet modification when the vanity has an unusually shallow depth, an off-center drain, a fixed shelf, or a narrow opening caused by thick face frames. A properly fitted U-shaped drawer can provide more usable access than several small bins, but it costs more and may require removing the cabinet contents for installation. If the cabinet floor is damaged by water, replace or reinforce it before installing a heavy pull-out.
The best system is the one that leaves the P-trap visible, keeps shutoff valves reachable, and brings everyday supplies forward. Measure twice, preserve a leak-check zone, and match the organizer to the plumbing layout rather than trying to force a standard box into an irregular cabinet.