Key takeaways
- The breaker, switch, grounding, cord, receptacle, or strain relief conflicts with the listing.
- The sink opening is cracked, flexible, or incompatible with the supplied flange.
- The wall drain is too high, corroded, blocked, or needs vent alteration.
- Air-gap, backflow, ground-fault, or permit requirements are uncertain.
- Water appears near electrical components or concealed cabinet damage is present.
A garbage disposal hangs from the sink, joins the drain, may receive a dishwasher hose, and contains a high-torque motor. All four systems must suit the exact unit. Use this guide to identify the work, then follow the product manual and local plumbing and electrical rules.
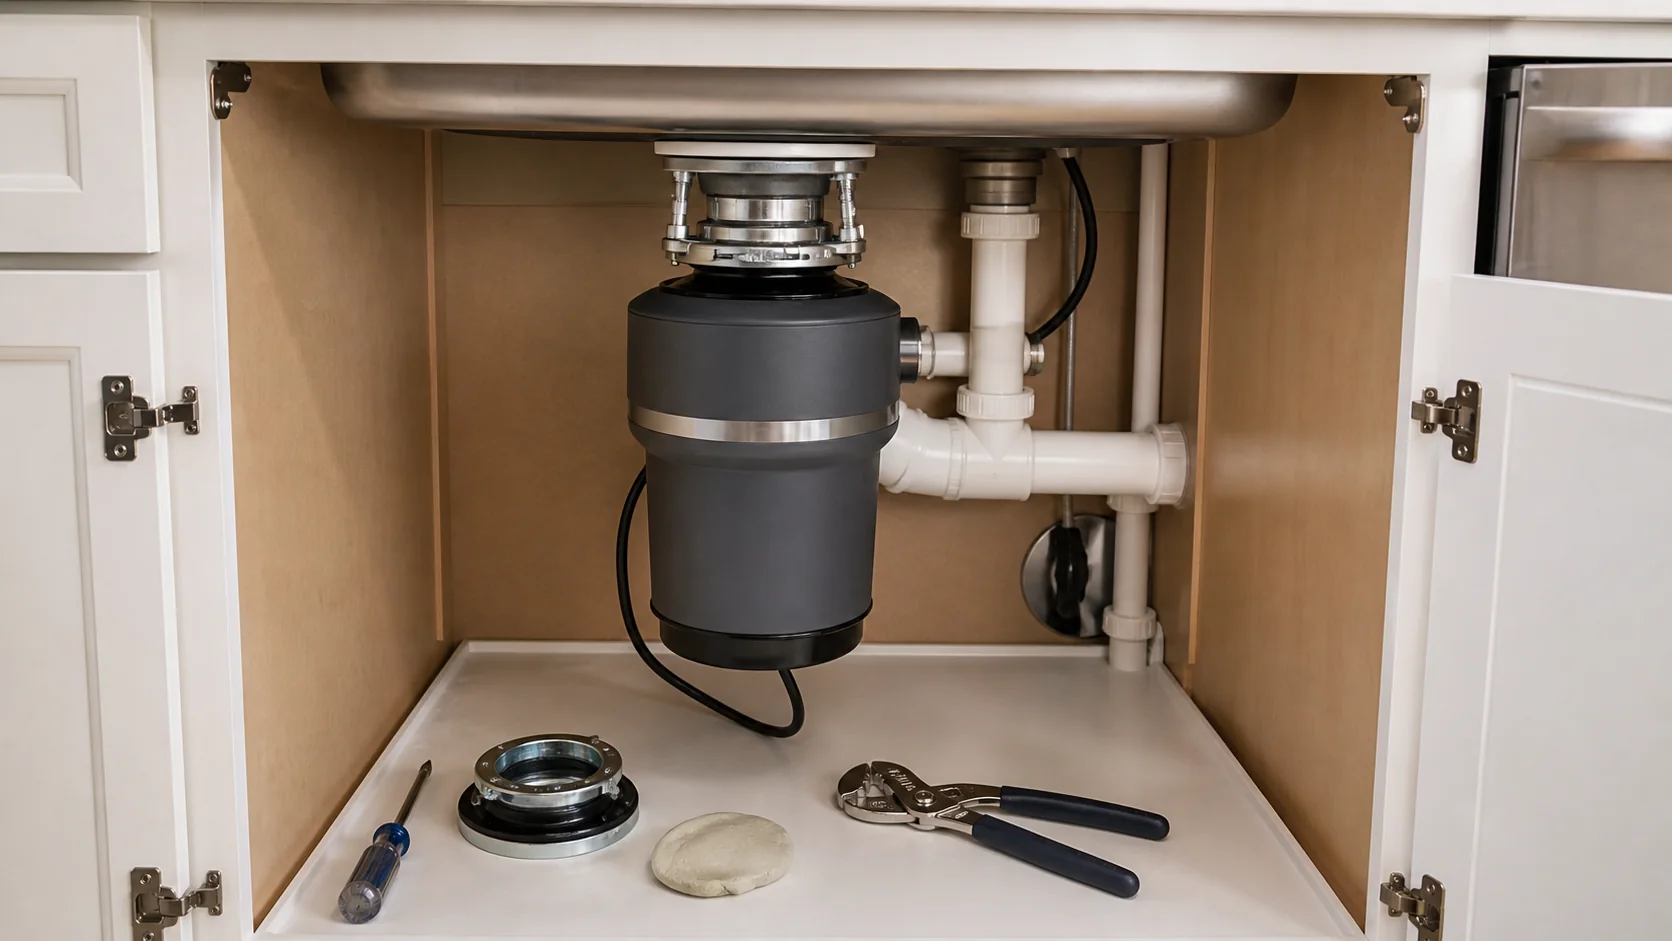
Identify the hardware and electrical variant
Photograph the cabinet. Record the disposal model, sink material, flange style, drain height, trap position, dishwasher route, switch, voltage, and circuit protection. Some units use a three-bolt mount; others use a twist-lock or proprietary collar. Similar-looking rings are not automatically interchangeable.
Our top picks
 InSinkErator Badger 5 Garbage Disposal with Power
- Finish: black
- Material: Stainless Steel
- Voltage: 120 volts
1/2 HP Dura-Drive induction motor for everyday scraps
Galvanized steel components built for long service life
Compact 11.5-inch housing fits tight under-sink spaces
Listing does not specify the warranty length
1/2 HP power trails the brand's higher-HP models
 Waste Maid Garbage Disposal
- Item Dimensions D x W x H: 5.2"D x 5.2"W x 12.9"H
- Material Type: Stainless Steel
- Capacity: 1.8 pounds
Six-year warranty plus lifetime corrosion protection
Standard 3-bolt mount simplifies direct replacement installs
Anti-jam grinding system reduces vibration and noise
1/2 HP motor handles lighter loads than higher-HP models
Continuous feed operation needs running water during use
 InSinkErator Badger 5 Garbage Disposal
- Finish: Stainless Steel
- Material: Alloy Steel
- Power Source: electric
Galvanized steel grind components built for durability
Compact 11.5-inch housing fits tight under-sink spaces
Backed by a long-running disposer manufacturing history
Power cord is not included with this model
Listing does not specify the warranty length
| Product | Key specs | |
|---|---|---|
| InSinkErator Badger 5 Garbage Disposal with Power | Finish: black Material: Stainless Steel Voltage: 120 volts | Check price |
| Waste Maid Garbage Disposal | Item Dimensions D x W x H: 5.2"D x 5.2"W x 12.9"H Material Type: Stainless Steel Capacity: 1.8 pounds | Check price |
| InSinkErator Badger 5 Garbage Disposal | Finish: Stainless Steel Material: Alloy Steel Power Source: electric | Check price |
 InSinkErator Badger 1 Garbage Disposal with Power InSinkErator Badger 1 Garbage Disposal with Power | Item Dimensions D x W x H: 8.75"D x 11.38"W x 8.75"H Material Type: Stainless Steel EU Spare Part Availability Duration: 1 years | Check price |
 Waste King Garbage Disposal for Kitchen Sink Waste King Garbage Disposal for Kitchen Sink | Material: Multi Voltage: 115 volts Number of Handles: 1 | Check price |
 InSinkErator Badger 5XP Garbage Disposal with Power InSinkErator Badger 5XP Garbage Disposal with Power | Finish: WaterborneGrey Enamel Material: Stainless Steel Power Source: Corded Electric | Check price |
 Moen Prep Series PRO Continuous Feed Compact Moen Prep Series PRO Continuous Feed Compact | Check price | |
 InSinkErator EVOLUTION 0.75HP 3/4 HP InSinkErator EVOLUTION 0.75HP 3/4 HP | Check price |
As an Amazon Associate we earn from qualifying purchases at no extra cost to you.
Check whether the unit ships cord-connected or is intended for hardwiring. A cord conversion requires the disposal maker’s listed kit and strain relief. Hardwired installations need the approved cable entry, accessible connections, grounding, and switching. Never reuse a cracked cord, omit the clamp, or guess which conductor is energized.
Also compare motor-body orientation with the cabinet contents. The dishwasher nipple must face a hose route without a sharp bend, while the discharge elbow must meet the trap without twisting the mounted unit. Confirm that the bottom service wrench socket and overload-reset button remain reachable after bins or filtration equipment return to the cabinet. If the replacement body is deeper than the former disposal, measure from the sink flange to the cabinet floor and from the discharge centerline to the wall trap. A unit that physically fits can still be incompatible when its outlet sits below the existing trap arm.
Gather supplies and confirm fit
Typical equipment includes eye protection, gloves, bucket, towels, flashlight, screwdrivers, adjustable pliers, putty knife, suitable electrical tester, and the model-specific wrench. Parts may include approved plumber’s putty or sealant, flange hardware, discharge gasket, trap fittings, dishwasher clamp, listed cord kit, and strain relief.
Read the sink and disposal manuals together. Stone, composite, fireclay, and specialty finishes may prohibit oil-based putty. Confirm flange diameter and sink thickness, cabinet clearance, and access to the reset and jam-clearing features. The disposal outlet must meet the trap without an uphill run. Correct poor drain geometry rather than forcing the discharge tube sideways.
Lock out power and remove the old unit
Turn off the wall control, switch off the supplying breaker, and prevent restoration with a lockout device or clear warning. Verify the disposal cannot start and test conductors with suitable equipment. Silence is not proof of de-energization.
Stop dishwasher use. Place a bucket beneath the trap, disconnect the drain and dishwasher hose, and support the old disposal before releasing its collar. Its weight can drop abruptly. Disconnect power only after verification. Scorched conductors, unclear grounding, brittle insulation, a wet receptacle, or an unidentified circuit requires a licensed electrician.
Seal and assemble the sink flange
Remove the former flange and clean both faces of the sink opening without scratching them. Dry the area. When both manufacturers allow plumber’s putty, form an even rope and seat the flange from above. Otherwise use the specified gasket or sealant and observe its cure time.
Below the sink, install the fiber gasket, backup ring, mounting ring, screws, and retaining ring in the illustrated order. Tighten multi-screw mounts gradually in an alternating pattern. Uneven pressure can tilt the flange or squeeze the seal from one side. Remove visible excess putty without rotating the seated flange.
Prepare the dishwasher connection correctly
Leave the dishwasher inlet knockout intact when no dishwasher drains through the disposal. When connection is required, remove the plug by the manual’s method before hanging the unit. Retrieve the plug from the grinding chamber; an abandoned knockout can damage the disposer.
Route the appliance drain using the locally required high loop or approved air gap. Push a sound hose fully over the nipple and secure it with the correct clamp. Replace a split, hardened, undersized, or oil-softened hose. Never compensate for damaged hose with excessive clamp pressure.
Connect the cord or hardwire supply
For a listed cord kit, pass the jacket through the specified strain relief, connect grounding and insulated conductors exactly as labeled, secure approved connectors, and close the cover without pinching insulation. The clamp grips the outer jacket, not individual wires.
For hardwiring, retain breaker lockout and follow the appliance diagram, cable requirements, grounding method, and electrical code. Do not hide an unapproved splice. Kitchen receptacle and ground-fault rules vary by jurisdiction and installation. If the supply configuration cannot be positively identified, stop.
Hang the unit and align the discharge
Lift the disposal squarely into its mount and engage every tab before rotating the collar fully into the locked position. Confirm secure engagement while supporting the body. Orient the unit so its reset, service opening, wiring cover, and dishwasher nipple remain reachable.
Install the supplied discharge gasket and tube. Align the outlet with proper fittings instead of levering the appliance or compressing a joint at an angle. Maintain the required fall toward the trap and keep the trap below the outlet. Avoid double traps and corrugated sections that retain debris. Moving a wall drain or vent may require a plumber and permit.
Leak-test before restoring electricity
Keep the circuit off. Stopper the sink, add several inches of water, and inspect the flange below. Release the water and watch the discharge, trap, and dishwasher nipple. Dry each connection, then touch it with clean tissue to reveal a slow seep. Rebuild a leaking gasket joint; indiscriminate tightening can crack nuts or deform seals.
Once every connection remains dry, remove tools from the chamber and cabinet. Restore power, run cold water, and operate the disposal briefly as directed. Stop for scraping, severe vibration, movement, odor, or breaker operation. Isolate power again before adjustment. Reinspect after a full sink drain and the first dishwasher cycle.
Code, permit, and professional stop points
- The breaker, switch, grounding, cord, receptacle, or strain relief conflicts with the listing.
- The sink opening is cracked, flexible, or incompatible with the supplied flange.
- The wall drain is too high, corroded, blocked, or needs vent alteration.
- Air-gap, backflow, ground-fault, or permit requirements are uncertain.
- Water appears near electrical components or concealed cabinet damage is present.
The disposal manual takes priority over generic instructions. It defines compatible accessories, fastener order, wiring, knockout removal, reset procedure, and forbidden practices for that model.
Coordinate the next decision with the under-sink plumbing layout.
Frequently asked questions
Does every flange need plumber’s putty?
No. Approved sealing depends on the flange and sink material. Some surfaces can stain or be harmed by oil-based putty.
Why does the discharge joint leak?
A missing, reversed, pinched, or reused gasket and angled tube alignment are common causes. De-energize the unit and rebuild the joint squarely.
Can the existing mounting ring remain?
Only when the new manufacturer confirms compatibility and the assembly is complete, undamaged, and correctly sealed.
What if the motor hums?
Switch it off immediately. Isolate power and follow the model’s jam-clearing and reset directions. Never place a hand in the chamber.
Final verification
Save the manual, serial number, cord-kit details, breaker identification, and photographs of the finished drain and closed wiring compartment. Recheck the cabinet floor the next day. A successful installation is firmly mounted, electrically compliant, serviceable, free from pipe strain, and dry during normal sink and dishwasher operation.